
A Beginner’s Guide to Good Ukulele Technique
BY DANIEL WARD | FROM THE SUMMER 2022 ISSUE OF UKULELE
Starting out as a beginner on any instrument is an exciting challenge that can reap great rewards. With the ukulele, it can be quite easy and fun to get going with some simple chords and launch right into a song with friends. It’s really quite magical how inviting the instrument is—you can learn just two or three chords and make music right away. Unfortunately, the fun can suddenly stop when you encounter your first difficult chord, or a strum that doesn’t seem to work quite right.
In this lesson, I’ll discuss some helpful ways to get your technique on track early. To get this info onto the strings you’ll explore a handful of simple right- and left-hand exercises that make it easy to avoid early pitfalls that lead to frustration. Because the ukulele can be so easy and fast to learn, many of us will pick up some habits that make things more difficult later, so let’s look at some preemptive fixes!
Do the Caterpillar
One of the first things I teach beginners is the “caterpillar,” as shown in Example 1. The ukulele’s strings run perpendicular to the frets, so keeping your fingers parallel to the strings and using the very tips to press down right behind (not on top of) the frets will produce the best sound with the least amount of force needed. Well, that sounds complicated! Luckily, the caterpillar makes it simple to identify and execute the angles that will lead to great technique, and it will last as long as you play. Here’s how it works: just place your fretting fingers on frets 1, 2, 3, and 4 with fingers 1 (index), 2 (middle), 3 (ring), and 4 (pinky). Start with the fourth string and place your fingers all in a row on the same string.

With each fingertip right behind the fret and right on the tip, the second and third fingers will be straight up and down, and the first and fourth will come in at a 45-degree angle. Try to put all of your fingers directly in line with the string. This will not be possible unless you pull your thumb back and place it behind the neck straight up and down and behind your third finger.
If it feels like you are stretching to get your fingers in position, you’ll need to adjust a bit. Try placing your fourth finger first, and then stretch easily back as you put each of your other fingers in place on the single string. Try playing one note at a time starting with the first and leave each finger down as you go. Move to the third string and repeat; keep on going until you have played up to fret 4 on string 1. That’s it! Just do this drill for five minutes each day and you will have much cleaner technique for years to come.
Get the Hang of Strumming
Strumming is the most common way to pull sound from your ukulele. Folk, Latin, and even rock and funk strums with a pick all share the same technique. The simple motion of down-up-down-up (down is toward the floor and up toward the ceiling) is the key to mastering any strum, so in this rhythm alignment drill, the motion is just that. When strumming, be sure to let your wrist move freely, as if you’re shaking water off your fingertips. Using your whole arm to go down and up is a big mistake and will lead to tension.
Advertisement
Try strumming down-up over and over on the open strings of your ukulele with just the tip of your index finger, or any group of fingers, thumb, or any combination that feels natural. Then, play Example 2a by strumming all of the down-ups on a C chord and, to get a feel for the rhythms, say, “Pass me the Saltines, why don’t you…” Keep the strum going for Example 2b, but just barely miss the strings on the syllables me and tines: “Pass… the Salt-… why don’t you…” In other words, you are still strumming up and down without interruption, but there are silent beats on the first up and the third down.

Once you hear the rhythm clearly you can relax and play it without reciting the syllables. You can also play it with different chords—try strumming one measure of C, followed by a bar of G7, for instance. Remember that all rhythms, no matter how complicated, can be created by staying with the down-up model and leaving spaces to accent. In this way, your sense of rhythm is always driven by an even measure of time and will eventually match to your ear with ease.
Fingerpicking Finesse
Fingerpicking is a technique that is perfectly suited to the ukulele. Not everybody starts on this right away, but I think it’s a great idea to get a feel for it early on. When you touch the strings individually with the fingers of your picking hand, you are learning to feel the instrument on a deep level that will connect you and your ears with the spacing of the strings, the vibrations of the sounds, and a wonderful way of hearing notes pop out from the strings. Fingerpicking can be used to pluck an easy intro or accompaniment to a song, or to do something more complicated, like adapt Travis picking (a guitar style pioneered by the great country musician Merle Travis).
In Example 3, play strings 4-3-2-1 in order with your right hand’s thumb (p), index (i), middle (m), and ring (a) fingers. String 4 is on top closest to your nose, so you’ll be playing down the strings starting with the thumb. I like to put all fingers on the strings at once to start, and then feel the tips of each finger touch the strings. Think of each stroke as a little spring that just pulls your finger through. Use the big knuckle at the hand to pluck and keep the smaller two just lightly bent. The strings will sound best if you play across them instead of pulling out away from them. Pluck the strings at the soundhole right where the
fingerboard ends so you have room to dig in a bit without running into the wood, and try to keep the back of your hand smooth and steady without bouncing too much. Once again, try this pattern on any chord you know.

Perfect Your Chord Switching
Finally, let’s look at the technique of switching between chords. Remember the linear feel of the caterpillar exercise, and to stay on the tips of your fingers right behind each fret as you finger each chord. I learned a special way of practicing chords from a guitar master, and it has helped me immensely all these years. Each time a chord is placed, there is tension needed to hold the notes down. Only use as much pressure as needed and no more. If you get a buzzing sound you may need to press a bit harder, but double check that you are on the tips and right behind the fret with each finger. If your angles are right and your thumb is behind the neck, there will be less struggle.
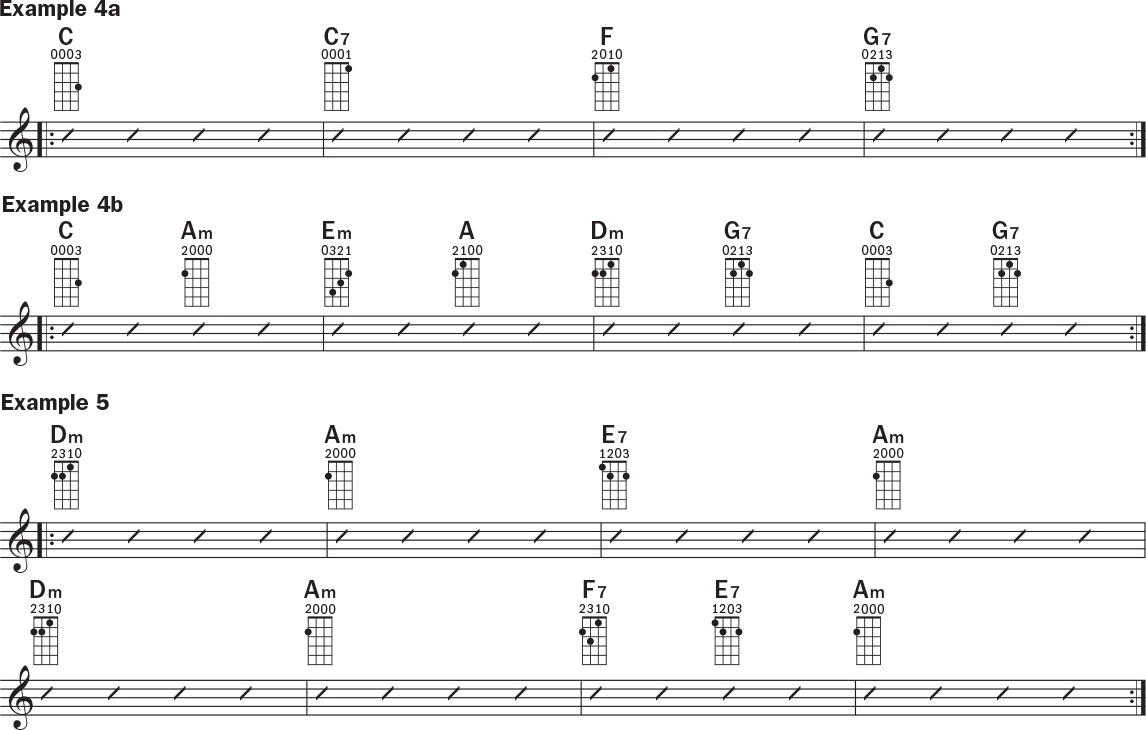
Examples 4a–b and 5 offer groups of chord progressions to play through. The magic of switching chords smoothly and quickly comes from the careful and slow process of feeling the tension needed to hold a chord, and then releasing it fully so you can move to the next shape with your hand relaxed before clamping down again. Think of your hand as a vice that has points of contact with the strings.
There are four motions to switching chords smoothly on ukulele, which should be practiced very slowly over and over until it becomes ingrained into the way you move between chords:
- Press down on the chord and play it
- Release all tension but stay there above the chord
- Move quickly to the new shape with no tension in your hand and hover above the frets
- Close the vice and put just enough pressure on to sound the new chord.
The slower you go and more you pay attention to each move, the faster and cleaner you’ll be able to move when you play in real time. At first it may seem like a lot of work, but if you play this way all the time, your hands will learn to be lightning fast, accurate, and smooth, and you won’t get fatigued as fast because you’ll be letting tension go between every shift and only using the pressure you need.
The more work you do with technique, the less you have to think about it when you are making music. Don’t get stuck listening to the sounds coming from your instrument as you play; actively pull the sound you are hearing out of your instrument and make music with every moment you have. Even the simplest drill becomes real music when you have the presence of mind to treat it that way.

